
CONTENTS
Unlocking the Secrets: How to Descale Keurig and Extend Its Lifespan
Are you a proud owner of a Keurig coffee maker? Keurig machines have revolutionized how we enjoy our daily cup of joe, offering convenience and a wide variety of flavors at our fingertips.
However, like any other appliance, Keurig coffee machines require regular maintenance to ensure optimal performance and a long lifespan. One essential maintenance task is descaling, which helps remove mineral deposits and scale buildup that can affect the taste and functionality of your Keurig coffee machine.
In this comprehensive guide, we will uncover the secrets of how to descale Keurig coffee machines effectively and extend their lifespan. Let’s go!
How to Descale a Keurig You Can Try

If your Keurig coffee maker has been suffering from reduced water flow or a less-than-optimal brew, it may be time to descale it. Now, let’s explore two effective methods that you can try to descale your Keurig.
Prepare The Machine
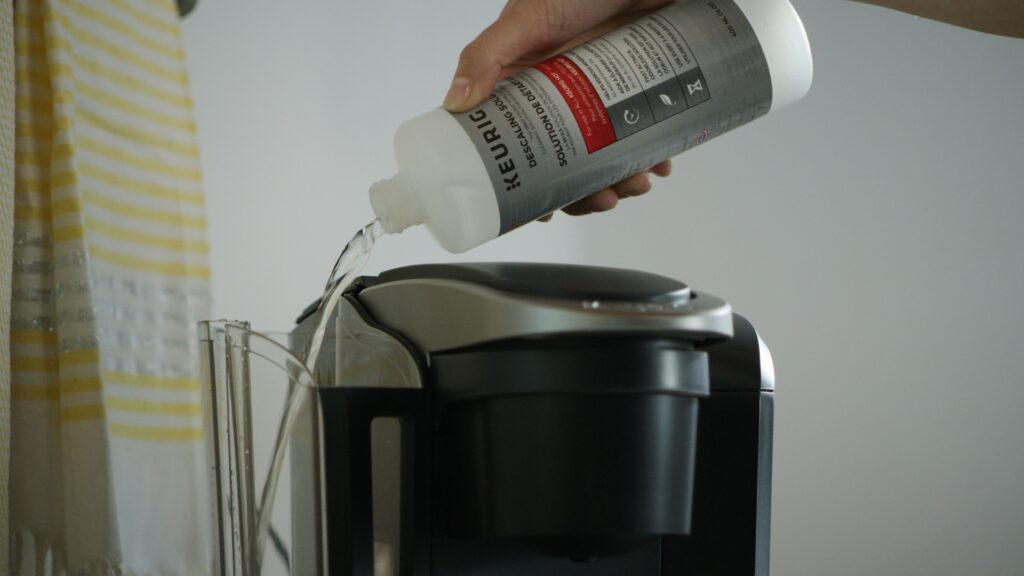
To begin the descaling process of your Keurig machine, the first step is to prepare it. Descaling is a crucial maintenance task that eliminates mineral deposits and buildup from the internal components, guaranteeing that your Keurig machine brews fresh and delicious coffee with every cup.
Fill the Reservoir with a Commercial Descaling Solution or a Vinegar-based Solution
Fill the reservoir with a commercial descaling solution or a vinegar-based solution. Refer to your Keurig machine’s manual for specific instructions on the recommended descaling solution and ratios.
Run The Machine Multiple Times
After preparing your coffee maker, you should run it multiple times to ensure thorough descaling. Follow these steps:
- Position a large mug on the drip tray to catch the descaling solution.
- Initiate the brew cycle without inserting a K-Cup pod, allowing the solution to flow through the coffee maker and into the mug.
- Empty the mug’s contents and repeat the process until the reservoir is empty. This guarantees that the descaling solution reaches all internal components of the coffee maker.
Flush the Reservoir with Fresh Water
After finishing the descaling process, it is essential to perform a freshwater rinse cycle to eliminate any lingering descaling solution from the water tank. Follow these steps:
- Fill the water tank with clean water.
- Run several brew cycles without inserting a K-Cup pod to flush out any remaining solution from the internal components.
- Empty the water from the mug after each brew cycle until the water tank is empty.
Cleaning Every Part Of Your Keurig
To keep your Keurig in top-notch condition, regular cleaning of every part is necessary. Let’s take a closer look at each component:
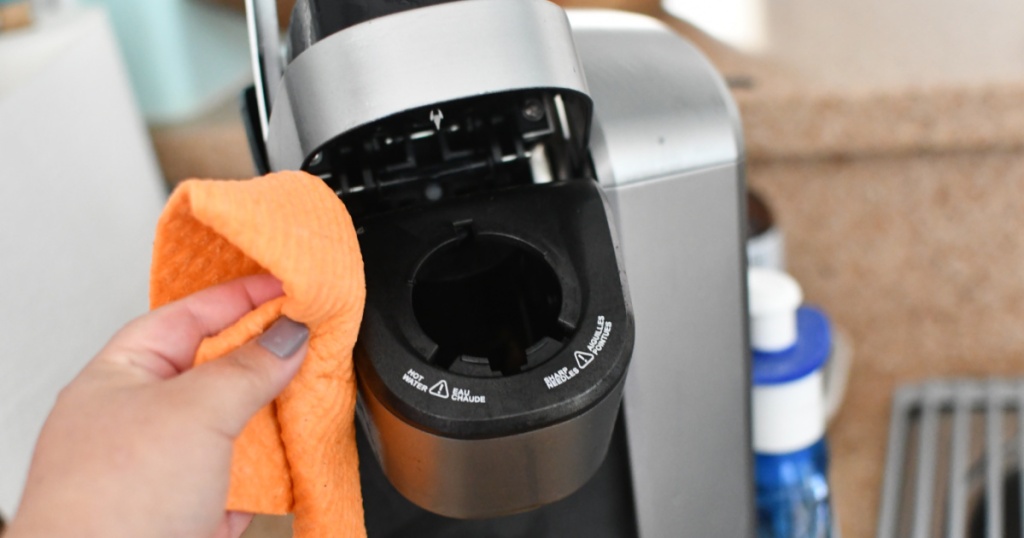
Brewer Needle
The brewer needle is responsible for puncturing the K-Cup pod and allowing the hot water to flow through. Over time, it can get clogged with coffee grounds or mineral deposits. Follow these steps to clean it:
- Power off and unplug the machine.
- Lift the handle to expose the brewer assembly.
- Locate the brewer needle and use a paperclip or a Keurig-approved needle cleaning tool to clear any obstructions gently.
- Once cleaned, lower the handle and plug the machine back in.
Reservoir
The reservoir holds the water used for brewing your favorite beverages. To clean it:
- Remove the reservoir from the machine.
- Wash it with warm, soapy water.
- Rinse thoroughly to ensure there is no soap residue left behind.
- Allow the reservoir to air dry before placing it back into the machine.
For optimal maintenance of your Keurig, it is recommended to replace the water filter cartridge every two months if your Keurig is equipped with one.
Exterior
The exterior of your Keurig can accumulate dirt, fingerprints, and spills. Here’s how to keep it looking pristine:
- Wipe the surface with a soft, damp cloth to remove dirt or spills.
- Use a mild cleaning solution or a mixture of water and vinegar for stubborn stains.
- Dry the exterior with a clean, lint-free cloth to prevent water spots.
Pod Holder
The pod holder is where you insert your K-Cup pods for brewing. It can collect residue from previous brews, leading to clogs. Follow these steps to clean it:
- Remove the pod holder from the machine.
- Disassemble the pod holder by removing any removable parts.
- Wash all parts with warm, soapy water.
- Rinse thoroughly and allow them to air dry before reassembling.
Mug Stand
The mug stand is the platform where you place your mug during the brewing process. Over time, it can accumulate coffee stains and spills. Here’s how to clean it:
- Remove the mug stand from the machine.
- Wash it with warm, soapy water.
- Rinse thoroughly to remove any soap residue.
- Dry the mug stand with a clean cloth before placing it back into the machine.
Frequently Asked Questions
How do I clean my Keurig with white vinegar?
Cleaning your Keurig with white vinegar is a popular and cost-effective method. Here’s how to do it:
- Mix equal parts white vinegar and water.
- Fill the reservoir with the vinegar-water solution.
- Run multiple brew cycles without inserting a K-Cup pod to allow the solution to clean the internal components.
- Flush the machine by running several brew cycles with clean water.
Is vinegar enough to clean a Keurig?
Vinegar is effective in descaling and cleaning your Keurig. However, if your machine has stubborn stains or mineral buildup, you may need a commercial descaling solution for a more thorough cleaning.
How often do you need to descale a Keurig?
The frequency of descaling your Keurig depends on the mineral content in your water and the frequency of use. As a general guideline, it is recommended to descale every three to six months. However, if you notice a decrease in performance or taste quality, it may be necessary to descale more frequently.
Conclusion
To guarantee a consistently delicious cup of coffee, it is crucial to maintain your Keurig coffee maker properly. By adhering to the step-by-step descaling and cleaning methods provided in this guide on how to descale Keurig, you can effectively prolong the lifespan of your machine.
It is essential to consult your specific model’s manual for detailed instructions and utilize only Keurig-approved cleaning solutions.
With regular upkeep, your Keurig will continue to brew exceptional coffee for many years to come.